Why does filament not stick to the glass?

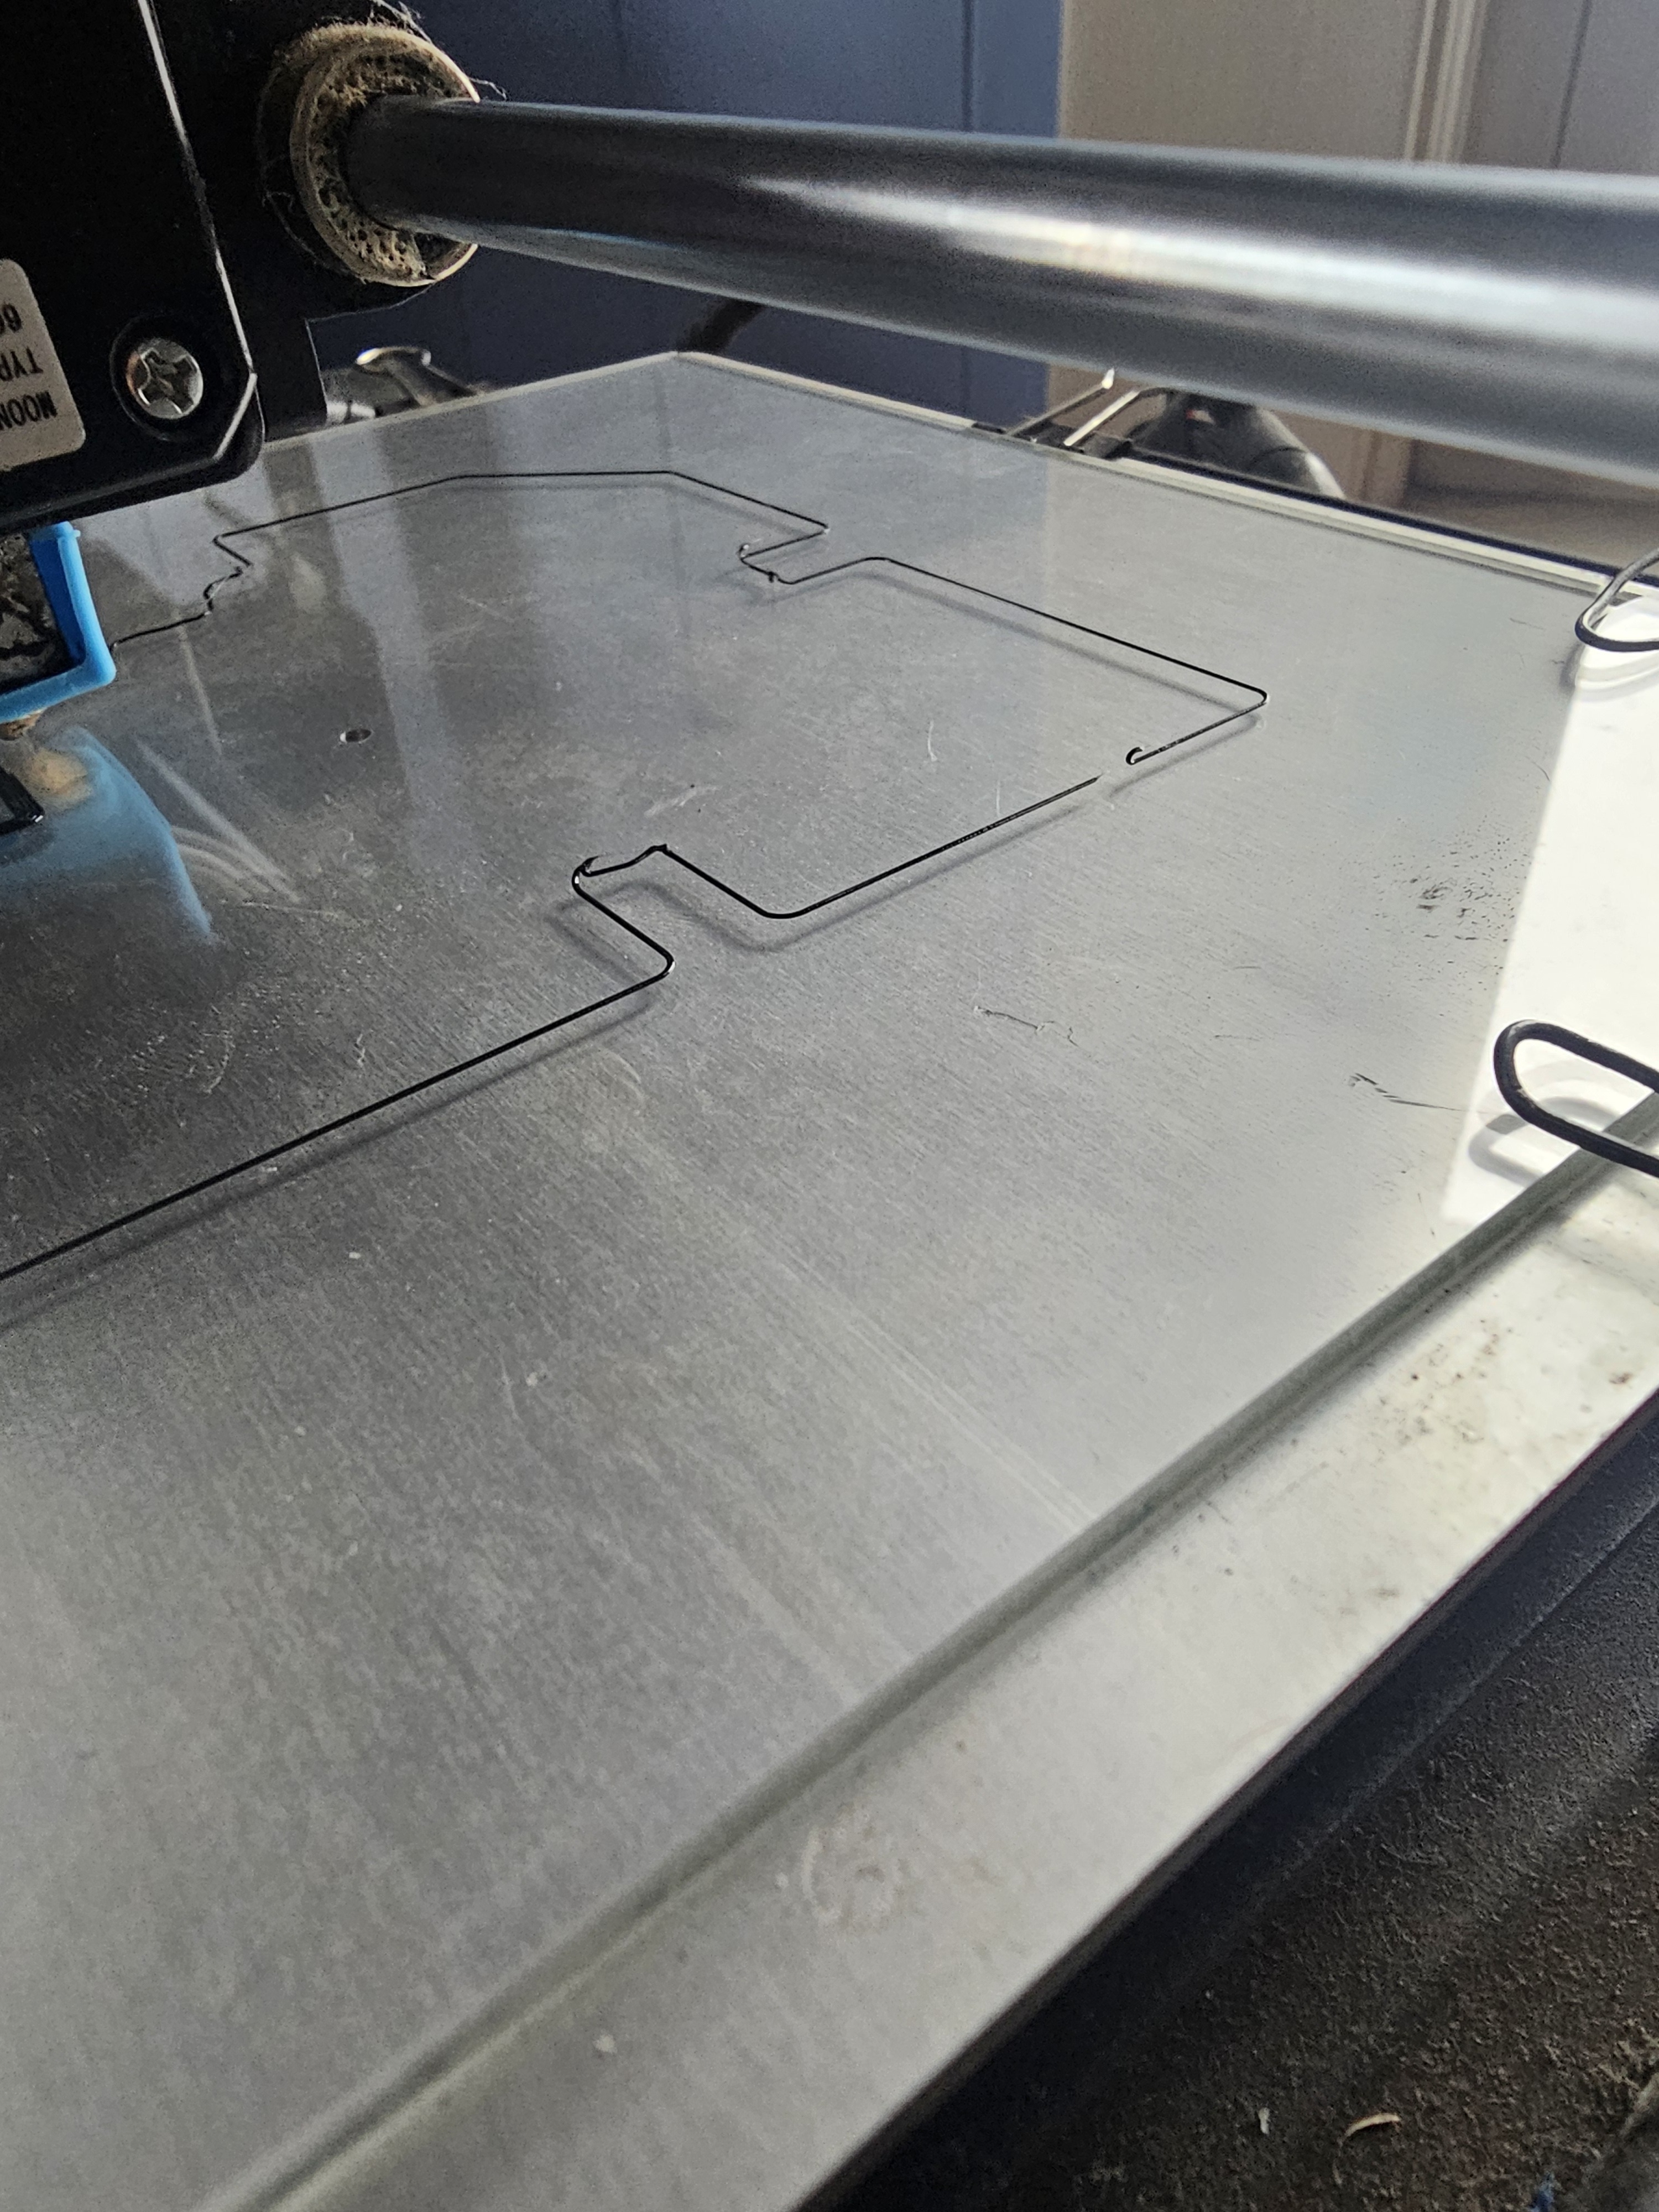
You can see where around corners and even some straight runs it is peeling up. I’m running first layer at an agonizing 15 mm/s. Using hatchbox pla filament, just dried in dehydrator. 200° nozzle and 70° bed. The glass is freshly cleaned with soap and water, I just did several atomic pulls, I’ve trammed at different heights using a feeler gauge, and absolutely nothing is working. Any one have any ideas?

Grass,

Those lines dont look flat enough to me. ellis3dp.com/…/first_layer_squish.html

The guide is largely klipper oriented but has marlin instructions after the klipper instructions.

Other than that I’ve tried some samples of bed adhesion aid of different brands which help for printing some of the bullshit filaments that stick to literally nothing and they are much less messy than hairspray or glue and most didn’t smell awful, but I haven’t found them to actually be necessary for anything other than the really slippery filaments.

ReakDuck,

I use Window cleaner.

Keesrif,

On top of some of the other tips, layer height being the most prominent, perhaps try a different soap or clean it with alcohol after. I’ve noticed a difference between soaps (and even between toilet paper brands) - some things leave a bit of residu I think.

scotticus42,

Hey man, your first layer isn’t getting enough squish by the looks of it. It likes a decent amount of push into the bed compared to some other materials. PETG doesn’t like as mush mash down as PLA. So if your printing PLA, try increasing your squish. You can do this via your z offset.

But do you really need your bed at 70? Mine runs and sticks just great at 60. 70 seems a bit warm for pla, as it keeps it just a bit too close to the glass transition temp for my liking. But if 70 has worked for you, then stay there.

But as another suggested, maybe raise your first layer temp by 5 or 10 and see if that helps. It might be that it needs a bit higher temp to flow better.

BingoBangoBongo,

Increasing temp by 5, plus recleaning the bed, plus doing some cold pulls helped a bit. I’ve always had issues getting things to stick at 60 for some reason, at least ever since I went to borosilicate. I’ll try adding more squish, since I have to dehydrate my filament before I give the print another shot.

20inmyhead,

Increase the temp on your first couple layers by 5°. I’ve found that really helps with adhesion. If you’re still having difficulty with certain prints try using a brim.

BingoBangoBongo,

This was the brim printing. But increasing temp did seem to help!

CaffeinatedMoth,

Many suggest adding some type of adhesive to the surface, and I have a trick that might interest you. Glue sticks and hairspray are messy and are a pain to clean. When I used a glass bed, I kept about a tablespoon of sugar dissolved in little less than a cup of water nearby. One could use a paper towel to wipe a thin film over your glass bed. I did this as it warmed up and the water dried quickly, leaving a thin tacky surface. One could put it in a small spray bottle too. Very easy to clean with water. If you eventually get buildups after weeks of printing, a quick wash with soapy water cuts through instantly. Give it a try. I could never get PLA to stick to my glass bed. PETG worked sometimes, and other times it bonded too well and broke the glass when it was removed, or cooled to the point of removing. The sugar water worked there too in providing a sacrificial layer that protected the glass and made removal easier.

BingoBangoBongo,

This is a really interesting idea! Ill give it a try.

danieljoeblack,

I was having trouble with my glass bed originally, to get it working nicely without glue or hairspray I:

  • made sure the bed was very clean, I use rubbing alcohol to clean it
  • dialed in my z offset, I usually match it to my layer height, so if I’m printing at 0.2mm that’s what I set the z offset to
  • upped my print temp a bit, I usually print at 205-210 with PLA

Maybe one of those will help?

20inmyhead,

+1 for upping the temp. I always find printing the first couple layers at 5° hotter to helps a lot with adhesion.

BingoBangoBongo,

Increase in temp seemed to help!

Steve,

Hair spray is the way

BingoBangoBongo,

Yeah I was doing that for a bit but I hate cleaning it off the plate. I should have never switched to borosilicate 😂

massacre,

buy a cheap spray / spritzer, fill it with IPA, saturate the hairspray before paper toweling it off. You may have to take two passes to get it right. You can get away with a pretty good layer of the the hairspray, so I usually just touch up the bed with a spray between builds and clean after maybe 10 or something…

NoneYa,

The cleaning is pretty easy for me.

My method was hair spray on bed before printing. After print is done, take the glass off and put it in the freezer for under 1 minute. Take it out and the print slides off the glass with ease. Then take some dish soap and rub it all over both sides of the glass. Use a steel wool “sponge” on each side and run under warm water.

Be sure to have something over the drain as a strainer as the hair spray turns into a slime like wet spider webs and wouldn’t be good to go down the drain. Just take it out and put in trash when done.

Then you’re ready for your next print.

JustBrian7872,

Glass cleaner also works very well for removing most of the glue. Let it soak for a little and then use a scraper to remove the glue

GrayBackgroundMusic,

I’ve never had great success with glass. I know it’s popular.

What’s z your offset Calibration method? Have you run that lately? Mine is to print a 20x20 mm, filled-in square and see how good the lines fuse. There are many guides. Look for one that shows the pictures, like this www.anycubic.com/…/how-to-fine-tune-z-offset

BingoBangoBongo,

I’m ashamed to say, I do z offset by just tramming with a feeler gauge to adjust. I believe my initial layer is .2mm and I trammed it to.05mm and it smooshed too much, and still peeled up. .07mm was much to tall, and this was at .06mm. I finally got the print working after doing some more cold pulls and recleaning the glass a little better.

EitherEther,

Did you try putting anything on the surface to assist adhesion? Hairspray? Glue stick?

Shdwdrgn,

Is that just bare glass? I’ve never seen anyone have consistent luck getting filament to stick on that except when using hairspray or glue sticks. You’d be better off with borosilicate glass, or you could get a sheet of G10 and put a PEI sticker on it (unless you’re using nylon filament). If you have a magnetic sheet on your bed you can also get PEI on spring steel.

BingoBangoBongo,

It is borosilicate, which is a decision I’ve come to regret. Using hair spray and glue sticks works, but is so messy to clean

Shdwdrgn,

I’ve had mixed results myself. When I first got my Ender 3 I picked up the Creality glass and it was amazing, everything stuck without much effort, and popped loose once the glass cooled down for a few. After a couple years I started wearing out the surface texture so I picked up a new piece from the same seller. Nothing would stick to it no matter what I did (other than hairspray, but I agree – yuck!) so I finally started experimenting with other plates. The G10 is good stuff and pretty cheap if you’re willing to cut it to size yourself, but I still had some issues with it not sticking as good as my original glass. Meanwhile I switched my printer over to a direct drive head which really threw a curveball in my settings so I pretty much had to work everything out from scratch again. I ended up dropping a PEI sticker on top of the G10 and that seems to have solved most of the problems.

That’s one of the bad things about the current state of 3D printers – it’s not ALL about the nozzle gap, there are other factors that come into play. I can set my gap in my sleep to within a few hundredths of a mm these days, but the same settings I used with the original head don’t work the same with the new one. So if you changed something right before you started having adhesion problems, it likely means you’ll have to play with your slicer settings to find what works now. It sucks, but I guess that’s the price we pay to be able to make things out of nothing.

ironhydroxide,

Looks to me like your offset is wrong, or your first layer height is too large

EitherEther,

Yeah, agreed. It looks like it could use a bit more squish.

lemann,

Seconded (or thirded?) I have a (textured) glass bed and my first layer is usually quite a bit more squished than this

BingoBangoBongo,

I was able to get it printing, but doing some calibration confirms that adjusting z offset made the bottom layer better. What’s the point in z offset specifically, vs just changing the gap when tramming or the initial layer height?

p1mrx,

If your printer has a touch sensor, then raising/lowering the entire bed has no effect on the first layer. The Z offset defines the difference between the touch point and the first layer.

I think most people calibrate the Z offset for 0.2 mm, and then never change the first layer height.

Edit: oops, this thread is a month old.

  • All
  • Subscribed
  • Moderated
  • Favorites
  • 3dprinting@lemmy.ml
  • GTA5RPClips
  • DreamBathrooms
  • thenastyranch
  • magazineikmin
  • tacticalgear
  • cubers
  • Youngstown
  • mdbf
  • slotface
  • rosin
  • osvaldo12
  • ngwrru68w68
  • kavyap
  • InstantRegret
  • JUstTest
  • everett
  • Durango
  • cisconetworking
  • khanakhh
  • ethstaker
  • tester
  • anitta
  • Leos
  • normalnudes
  • modclub
  • megavids
  • provamag3
  • lostlight
  • All magazines